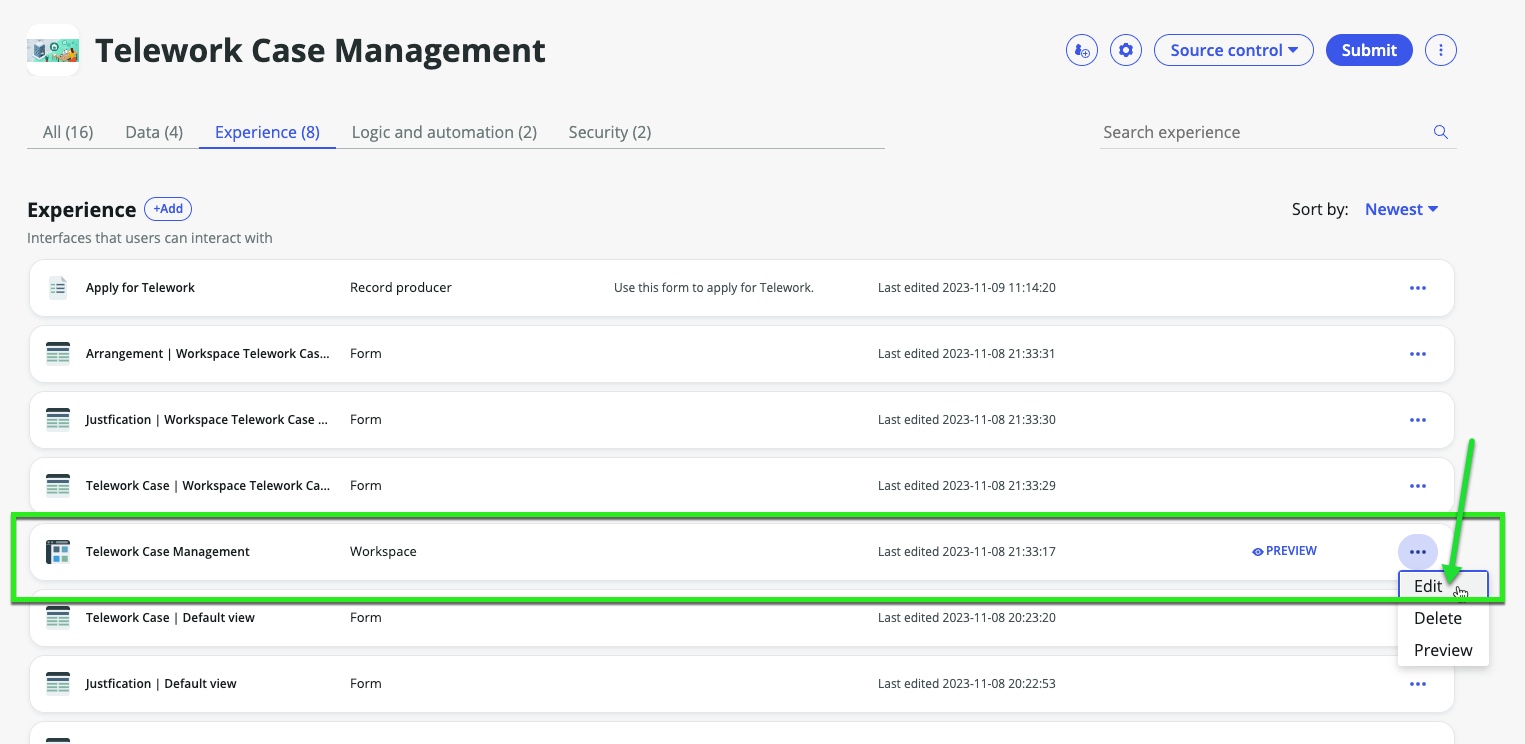
Adding a playbook to the workspace
Amandas team is growing and the workspace that she uses to manage and report on telework cases is now used by more of her direct reports. She has noticed some of the direct reports aren't always aware of what to validate on the requests and Amanda would like a way for anyone who views the Telework Cases to be guided through what to look for, ensure the process is followed and all cases are treated equally.
The solution for this is to implement a playbook into the workspace.
Playbooks allow workspace users to interact with a business workflow in real time from within Workspace. Agents can use Playbook to update records, upload attachments, and complete tasks across multiple workflow activities.
Click Here for More Info
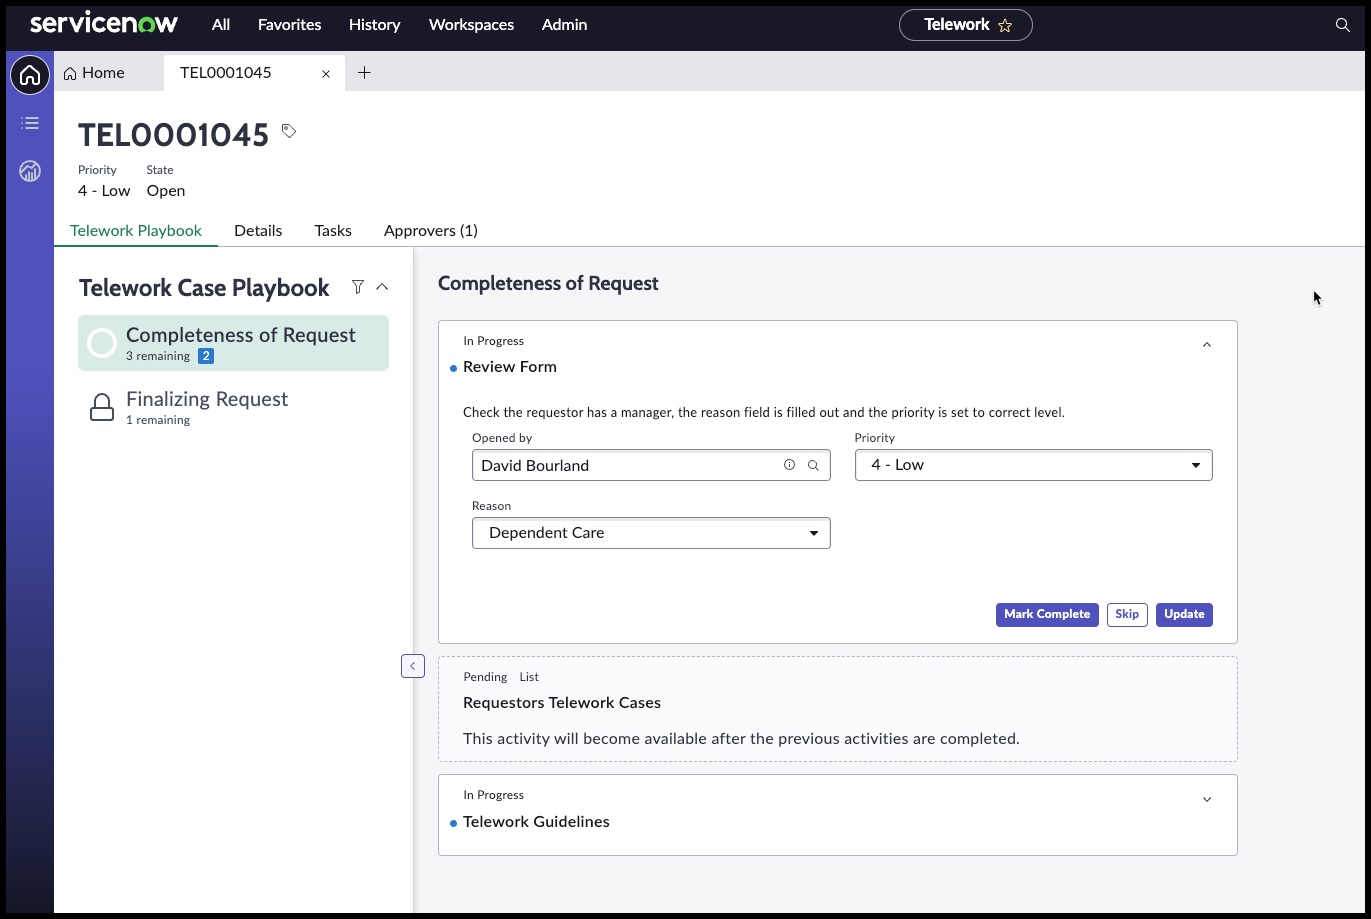
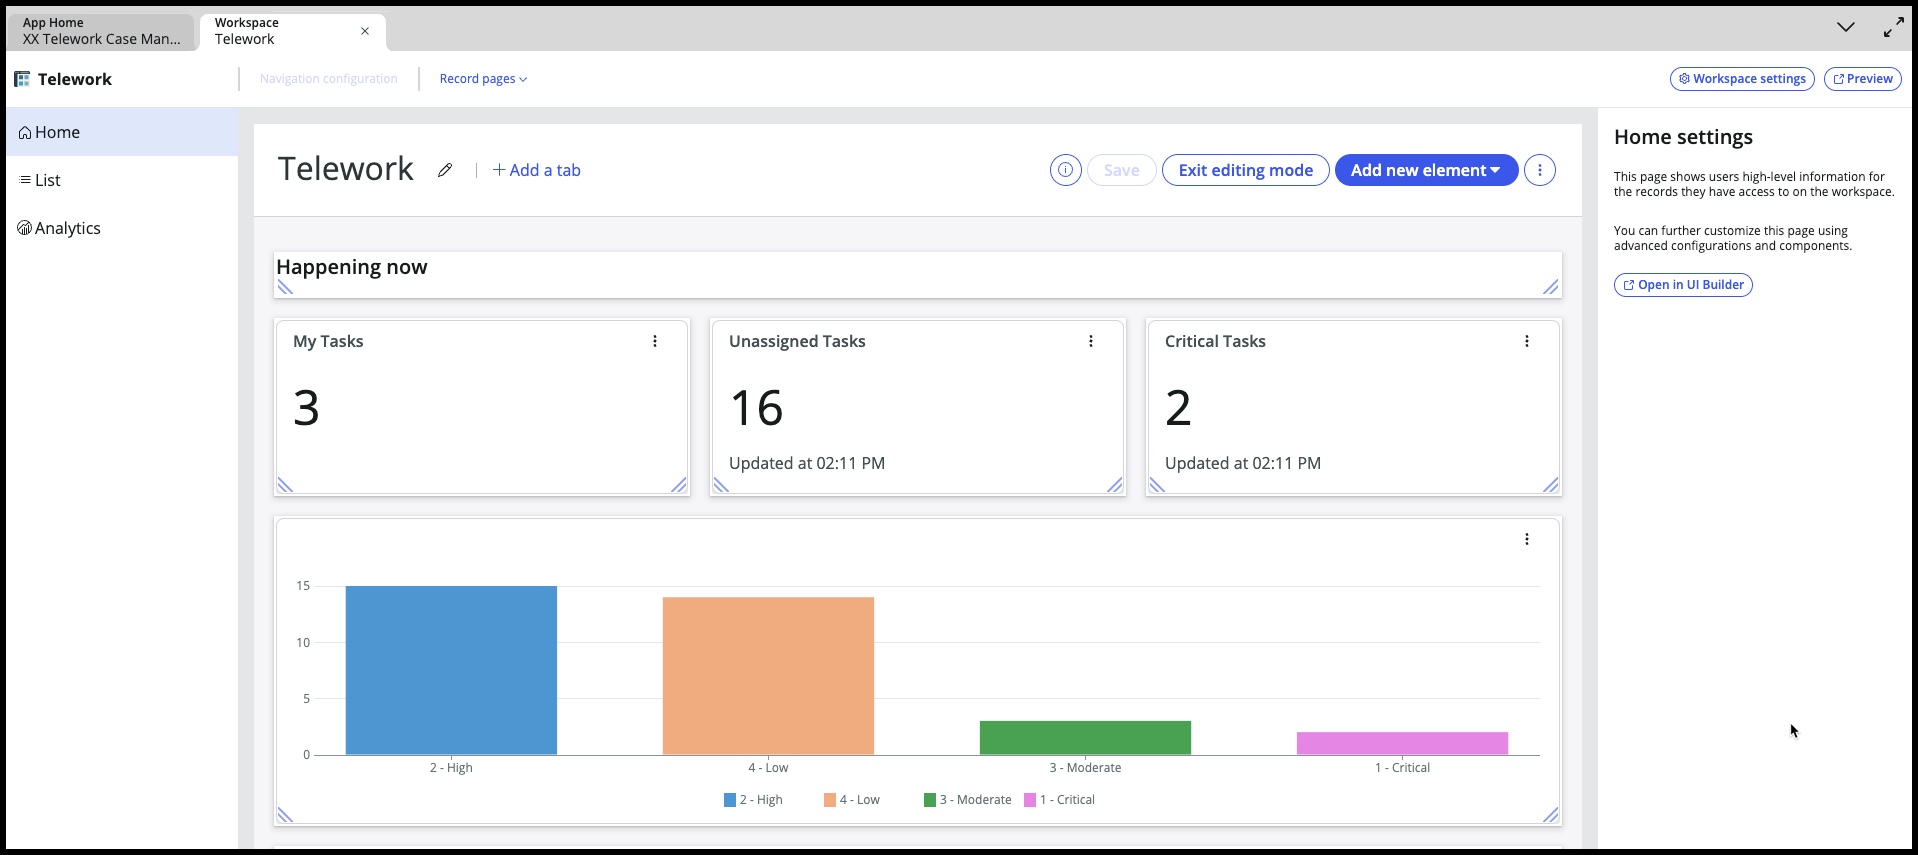
Example of a playbook in a workspace:
Steps to Adding a Playbook
| ➊ | Design your playbook in Process Automation Designer |
| ➋ | Test and Publish your playbook |
| ➌ | Add playbook to your workspace in workspace builder |
| ➍ | If you want to change the order of where the tab appears, use UI Builder |
Let's get started
Design your playbook in Process Automation Designer
➊ Go to 'All' ➋ Type in 'Process Automation Designer' ➌ Click on 'Process Automation Designer' (this will open up in a new tab in your browser) 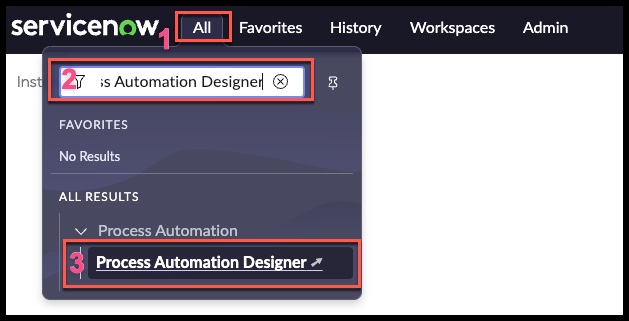
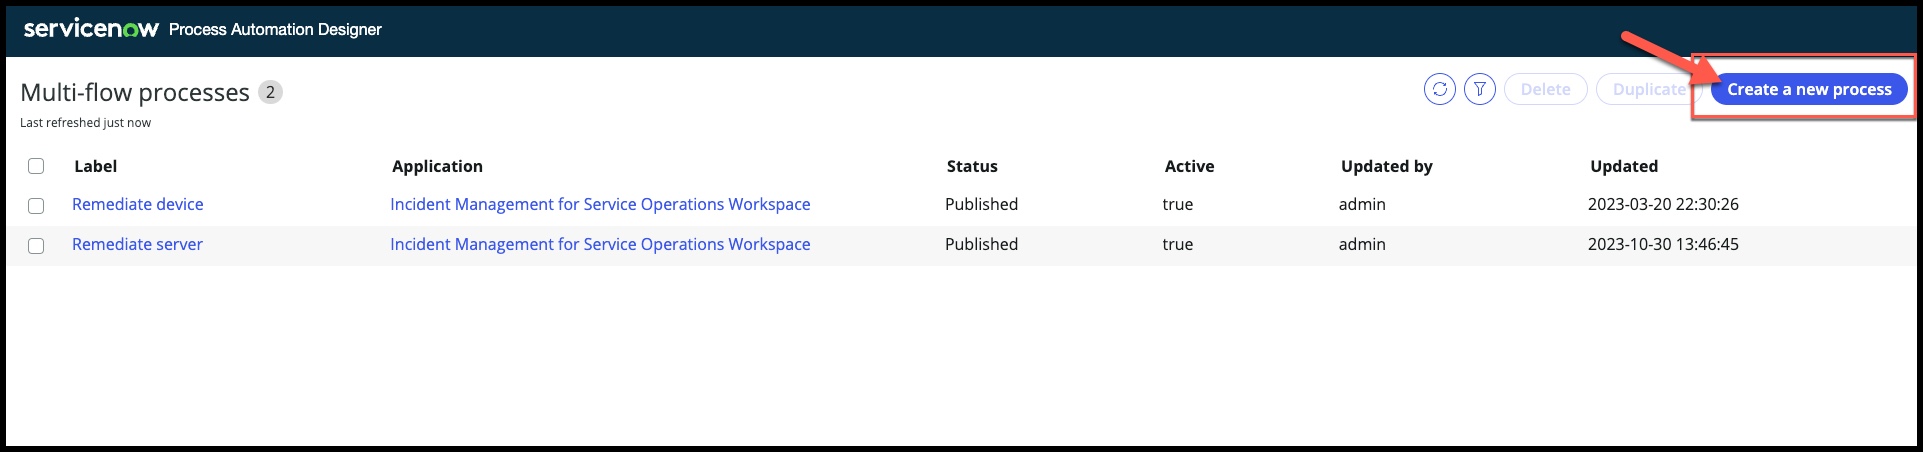
You are now in the Process Automation Designer list view showing you all the processes that have been completed.
Click on 'Create a new process'
Give your process a label and description (note: your application name should be the name of your Telework Case Management application, might be different than the one in the screenshot)
Steps Label Telework Case Playbook Description used to ensure completeness of telework cases, triggered when case is created Click Select a Trigger 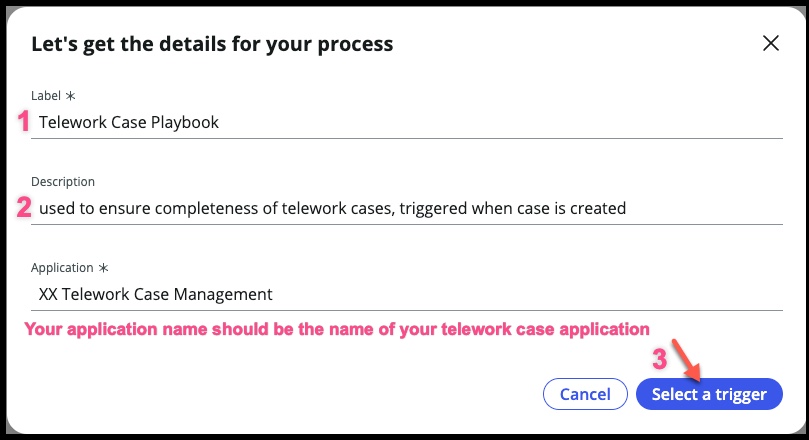
This is going to feel a lot like flow designer – in the background, flows are being triggered and used as we put together our process.
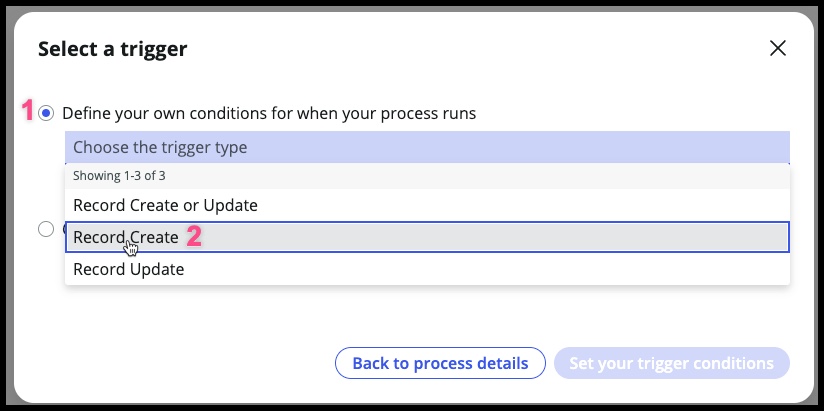
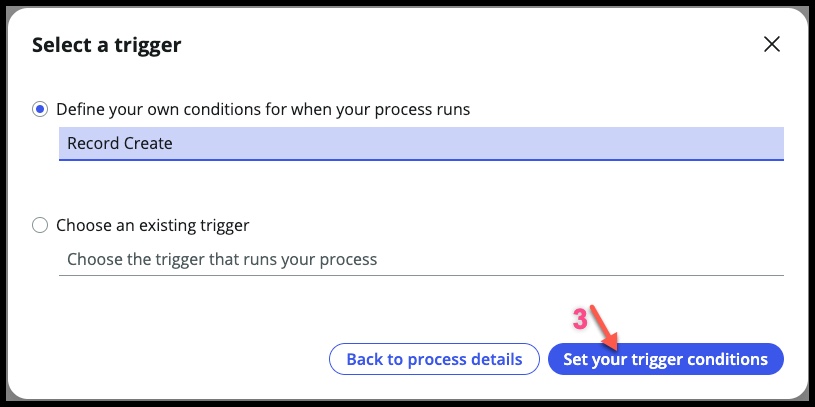
Select a trigger
Steps ➊ Choose the first option, "Define your own conditions for when your process runs" ➋ Choose "Record Create" ➌ Click on 'Set your trigger condition'
Finally, choose your table and conditions – we aren't going to have any conditions on types of records but that is an option.
Steps Table Telework Case Click "Go to Designer" 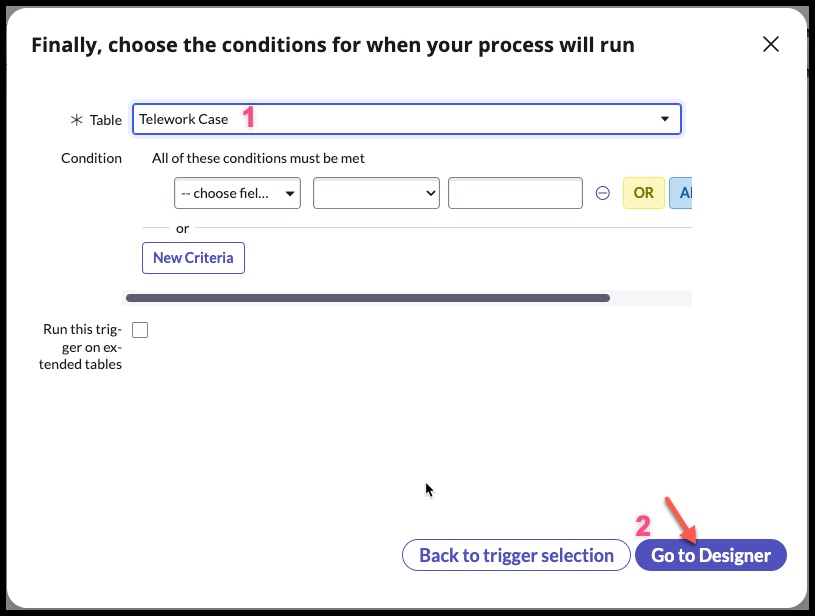
Switch to 'Board View'

You should now be on this page:

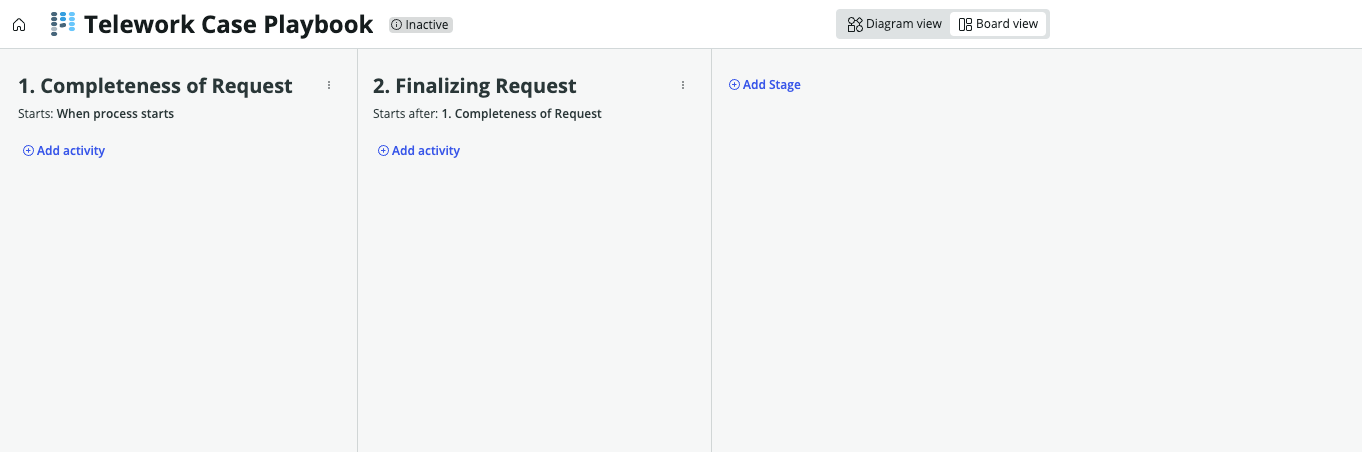
Next we will add 2 stages
Adding the First Stage
Steps Click Label Completeness of Request Description ensure all the information is provided When to start When process starts Click 'Save and close'
Adding the Second Stage
Steps Click (next to the stage you created) Label Finalizing Request Description ensure all approvals and tasks have been created and completed When to start After specific stages Click 'Save and close'
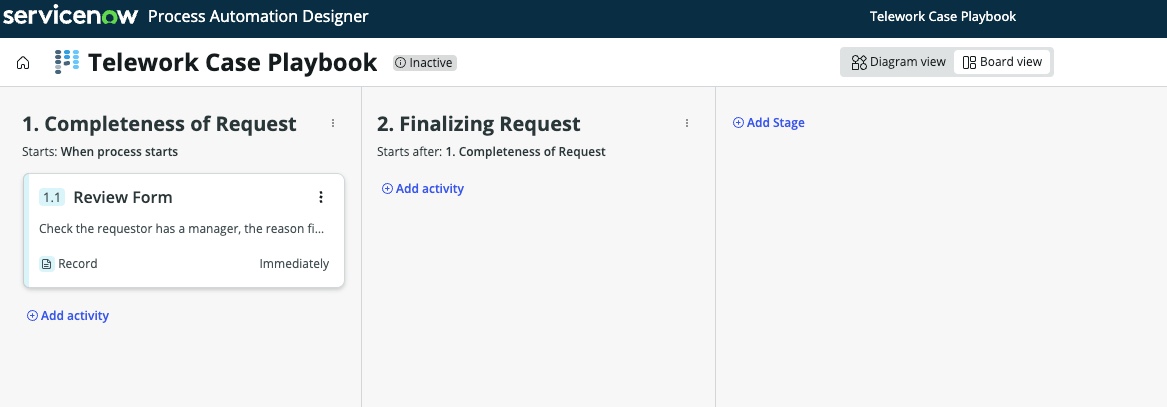
Your screen should now look like this:
In Column 1, Completeness of Request, we are going to add 3 activities
| Completeness of Request | |
|---|---|
| Activity ➊ | Check the opened_by has a manager, the reason field is filled out and set the priority |
| Activity ➋ | See if the opened_by has any telework cases already submitted |
| Activity ➌ | Give the workspace user the telework guidelines knowledge article if they want to attach it |
**Completeness of Request – Activity ➊**
Click
**Take A Break** Explore the Activity Screen
- 'Search Activities'
- 'Create a new activity' – to learn more about this, go here
(the boxes have been outlined with color to differentiate them. In your instance, there will not be color around each section)
- Red box: These are your bundled activities; in flow designer these would be your 'spokes'
- Purple box: In each Bundled activity, are the activities you can assign to your process. These can include interactive and non-interactive activities.
- Green box: For each activity, this box outlines what necessary info is needed for the activity to work.

More Info, Click Here
**Back to Lab and Adding Activity 1**
Note: We'll be using the 'Common Activities' bundle. Feel free to see what is under 'Global' and 'Process Automation Content' for ideas on what else you can add to a playbook.
Choose ➊ Common Activities ➋ User Form You should now be here:
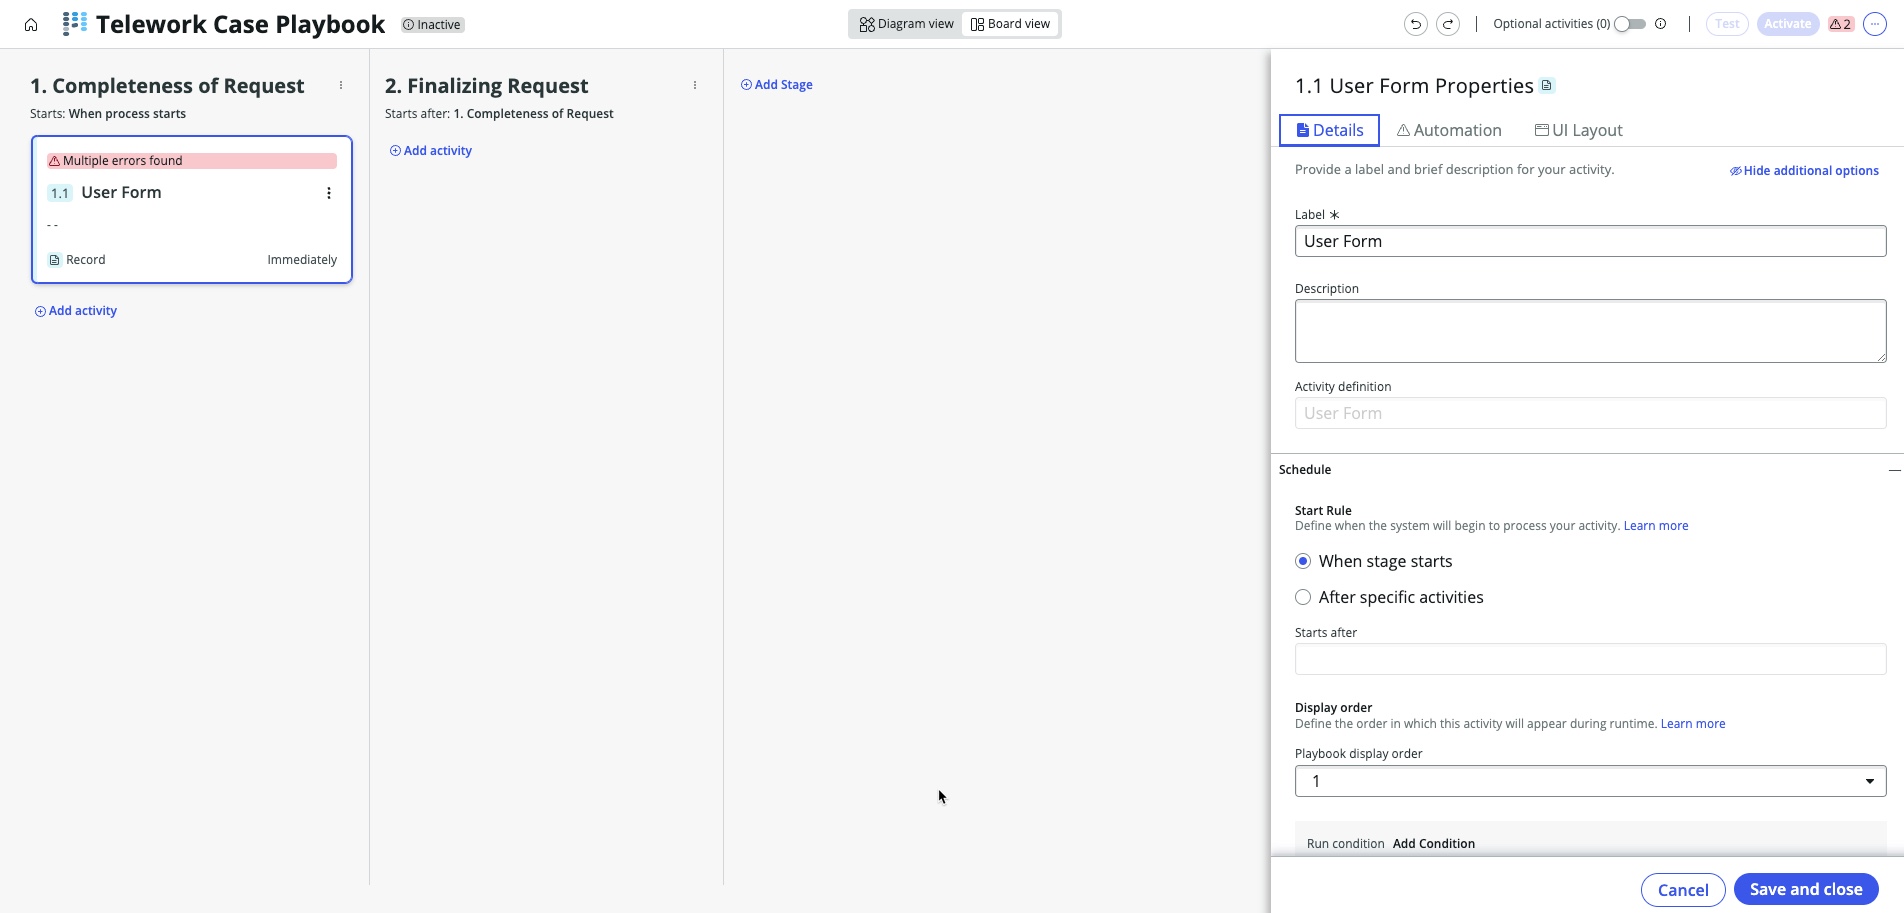
On the right hand side, is the activity properties. This is where we give the necessary info for the activity to work.
Fill out the form (Edit activity properties):
Choose Label Review Form Description Check the requestor has a manager, the reason field is filled out and the priority is set to correct level. Click 'Automation' TAB (DO NOT click on 'Save and Close') 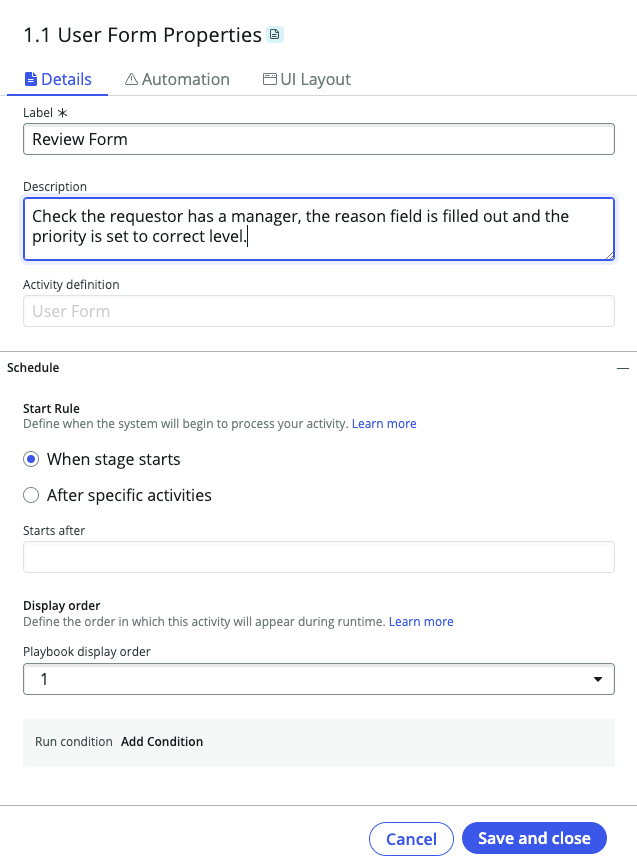
This activity has some inputs it needs
Choose Table Telework Case Record use the data pill picker to choose the trigger record, just like in flow designer Form Fields must type in string field: opened_by,justification,priority Click 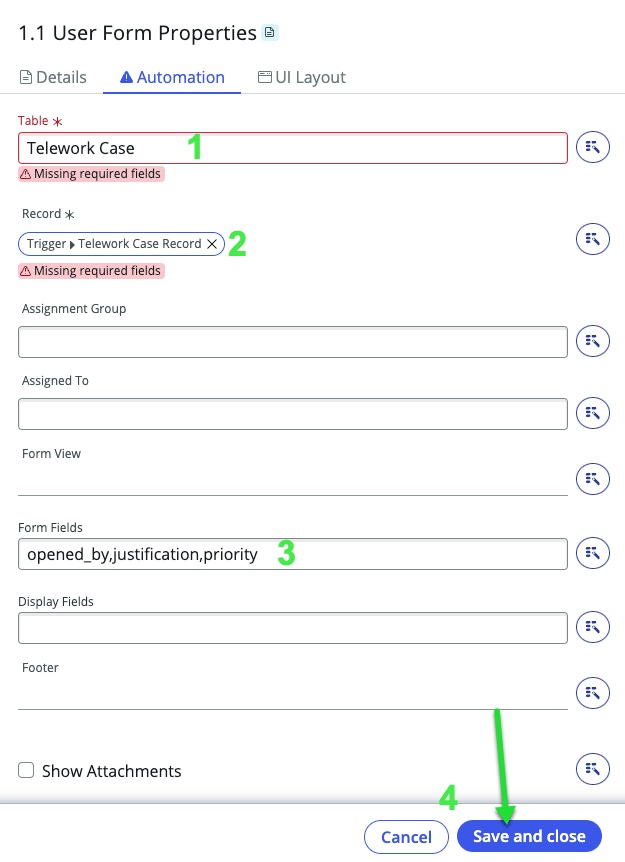
Before we go any further, let's test this out so you can see how this all will look to the workspace user.
Click on 'Test' in upper right corner near activate:
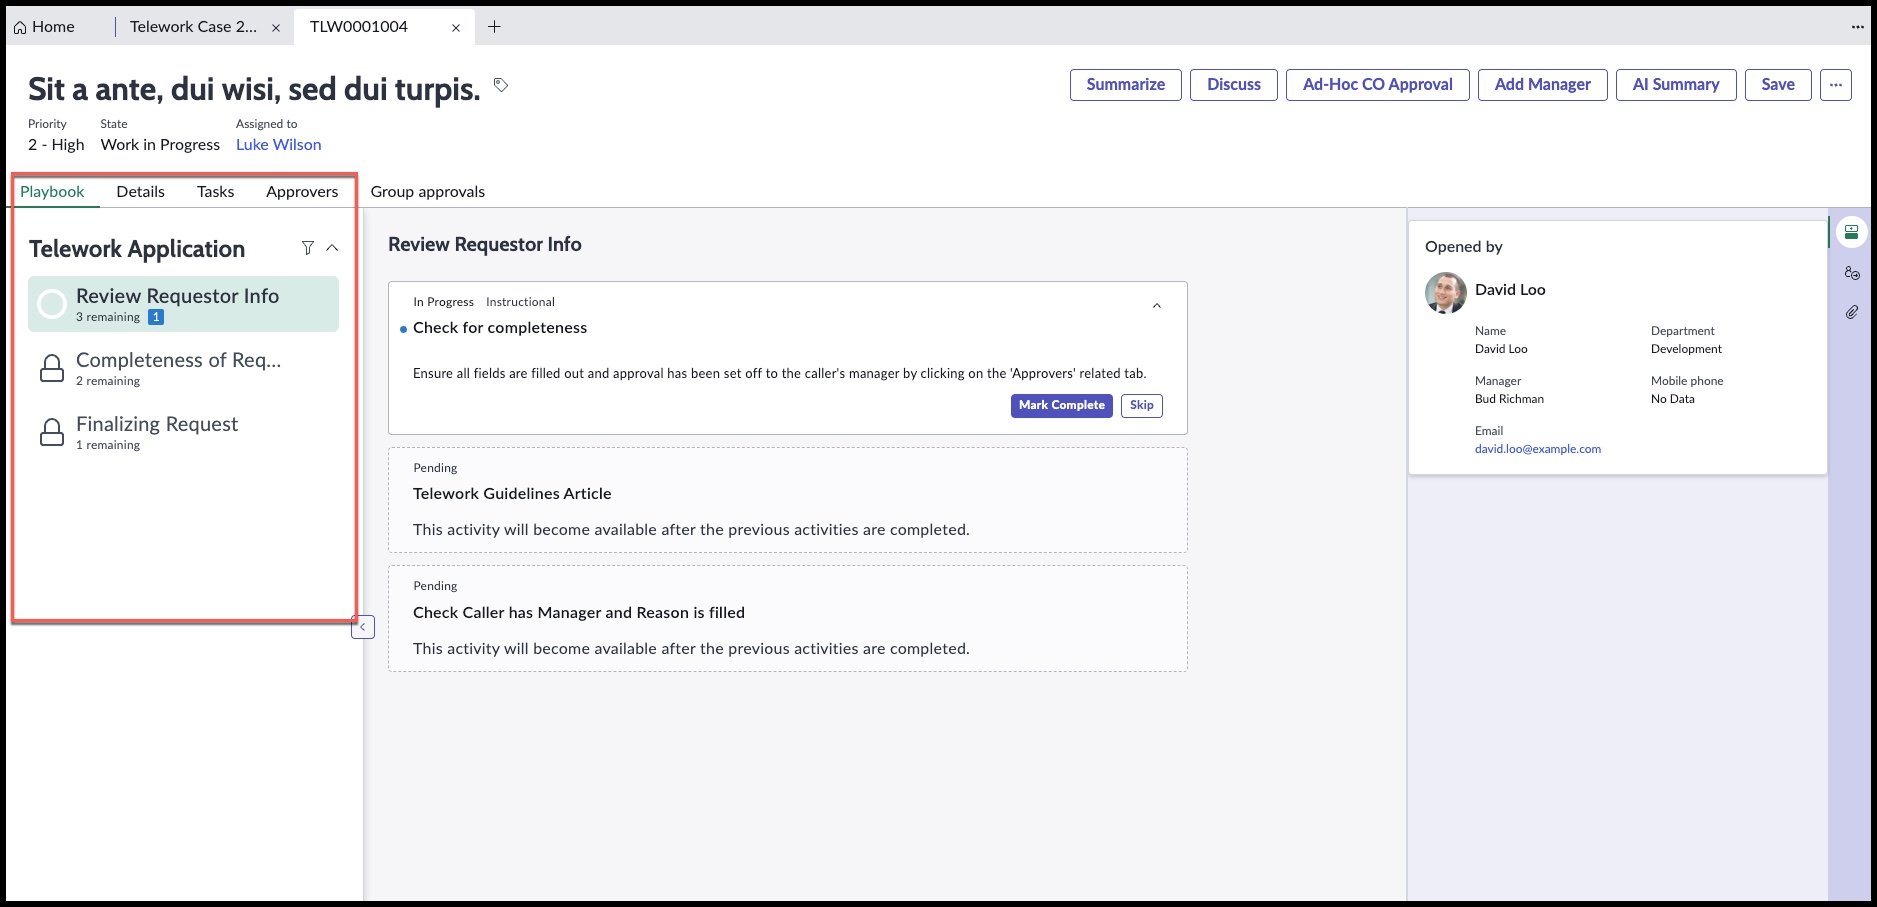
TEST ➊ Choose Telework Case record – the pictures below will be using TEL0001002 ➋ Click 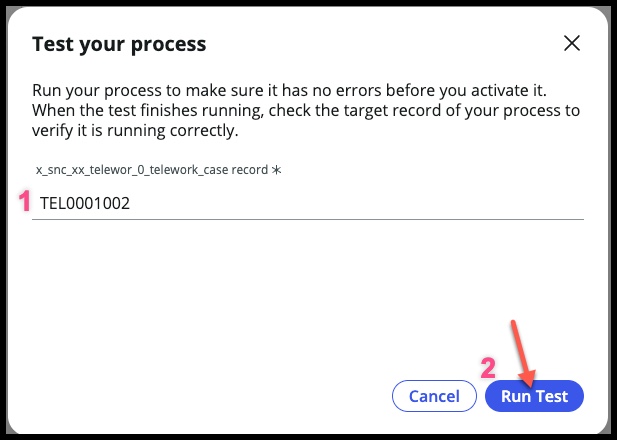
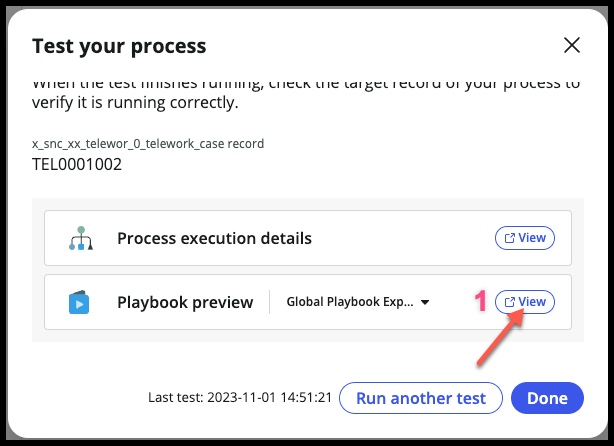
Choose the 'Playbook preview' – click on: View (it will open in a new browser tab)
Give this screen a moment to load – when it's done, it should look like this:
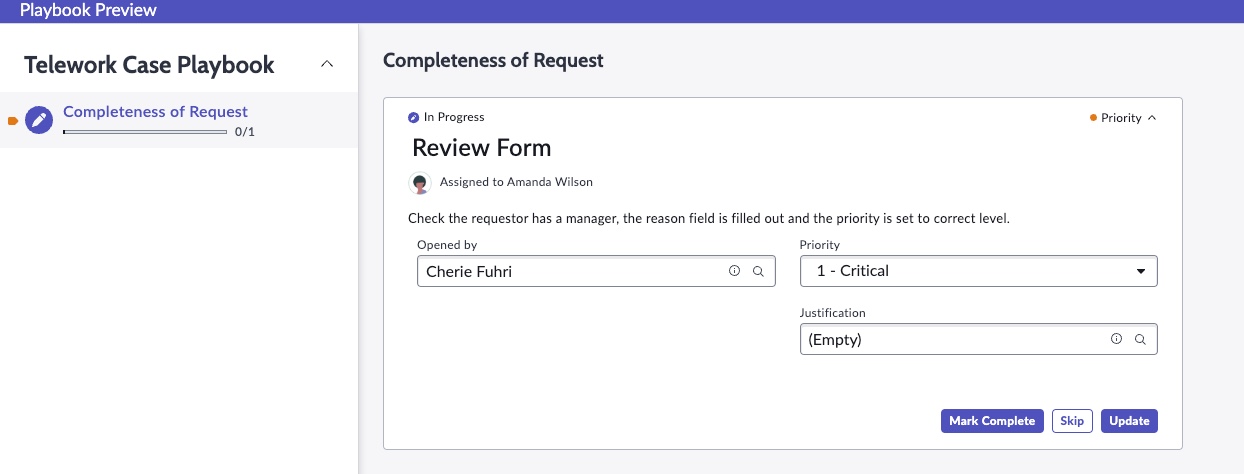
Try adding something for 'Justification' then 'Update' then 'Mark Complete'
In the bottom right corner is a 'cog' – you can open this up and try some of the extra settings. These can be configured in the experience tab for your playbook (not doing in this lab).
If everything looks good, you can close this browser tab then click and you should be back to your playbook designer here:
**Completeness of Request – Activity ➋**
After the workspace user has reviewed the form, we would like them to see a list of any telework cases that have already been opened by the requestor. That will be our next activity – adding a list of telework cases opened by the requestor.
Underneath 'Review Form' Click Choose ➊ Process Automation Content ➋ Show list of records 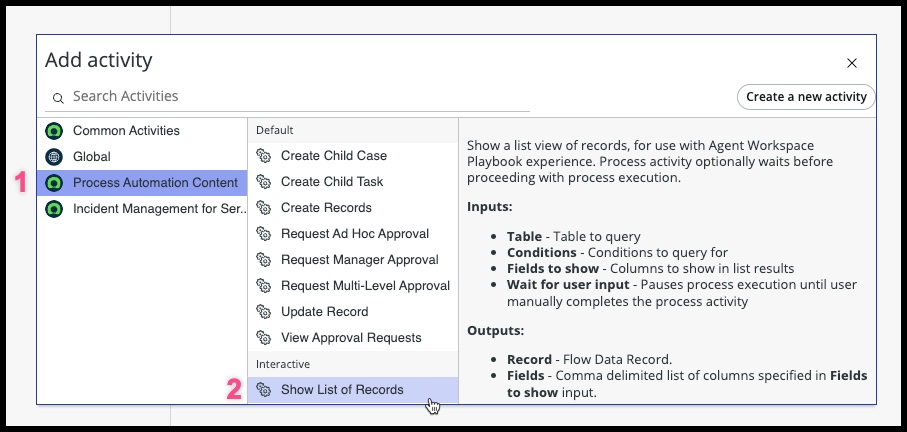
In the 'Edit activity properties' on the right hand side
Label Requestors Telework Case Description If the requestor has submitted any other telework case requests, they will be listed below Click 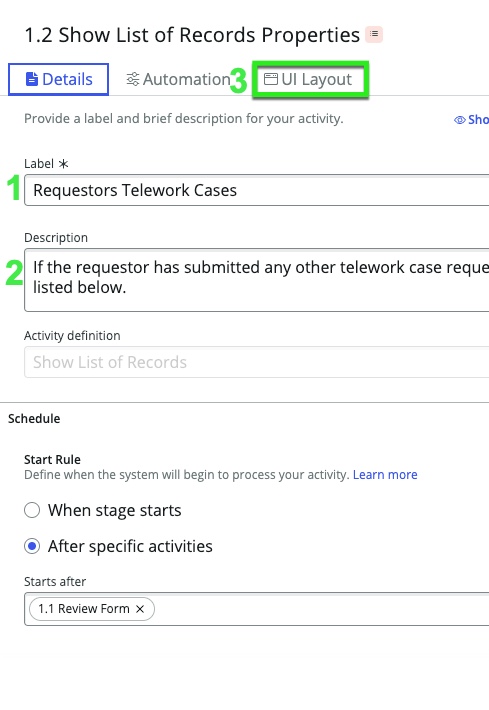
Fill out the 'UI Layout' tab
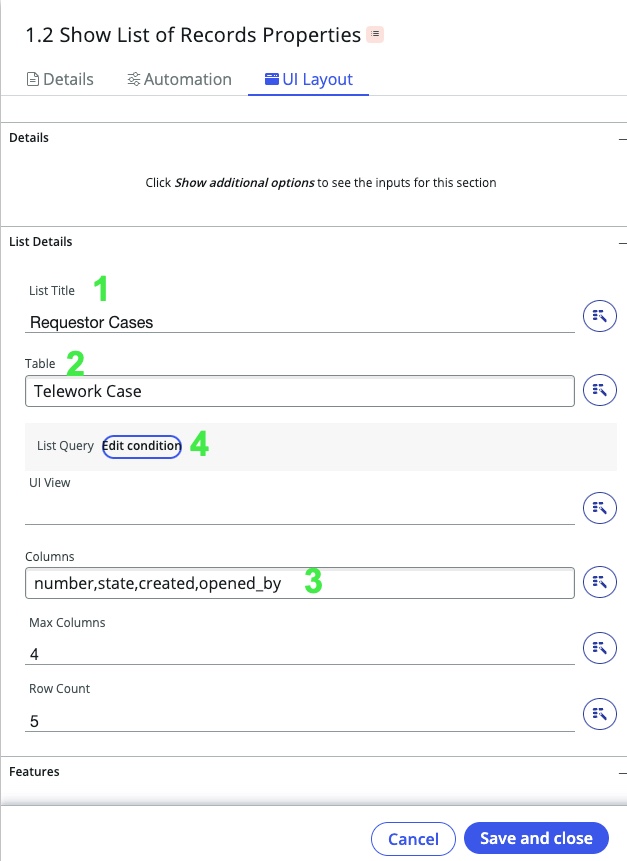
List Title Requestors Case Table Telework Case Columns Number,state,created,opened_by Click 'Add Condition' next to 'List Query' Condition: opened_by is opened_by
'Add Condition' will look like this (then click ):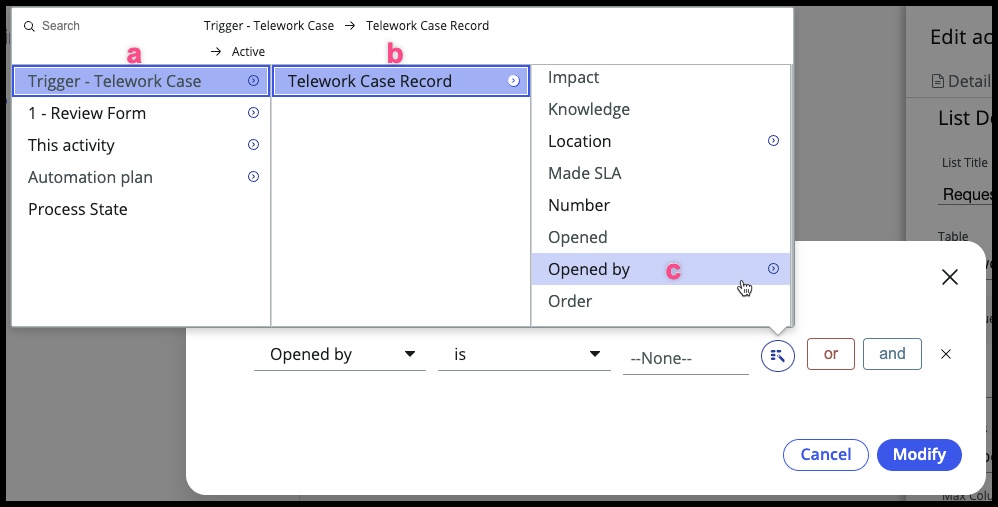
Before clicking on 'Save and close' your form will look like this:
Click 
**Completeness of Request – Activity ➌**
The last activity in this lane will be to show the workspace user the knowledge article on telework guidelines – many have asked to have this handy in case they need it at during the process or to attach for the requestor to review.
Underneath 'Requestors Telework Cases' Click Choose ➊ Common Activities ➋ Show Knowledge Article 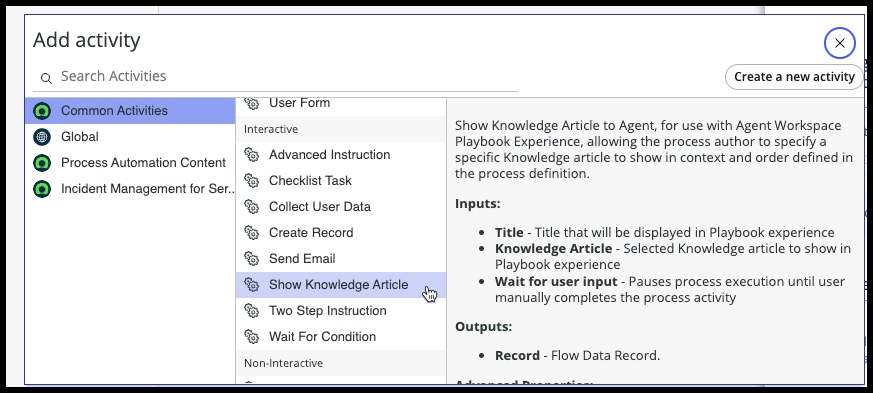
In the 'Edit activity properties' on the right hand side
➊ Label Show Telework Guidelines KA ➋ Description This will give the requestor the telework guidelines knowledge article so they can use it if needed in the process ➌ Start rule When stage starts (we want this to be available right away) ➍ Click Automation Tab (next to details tab) 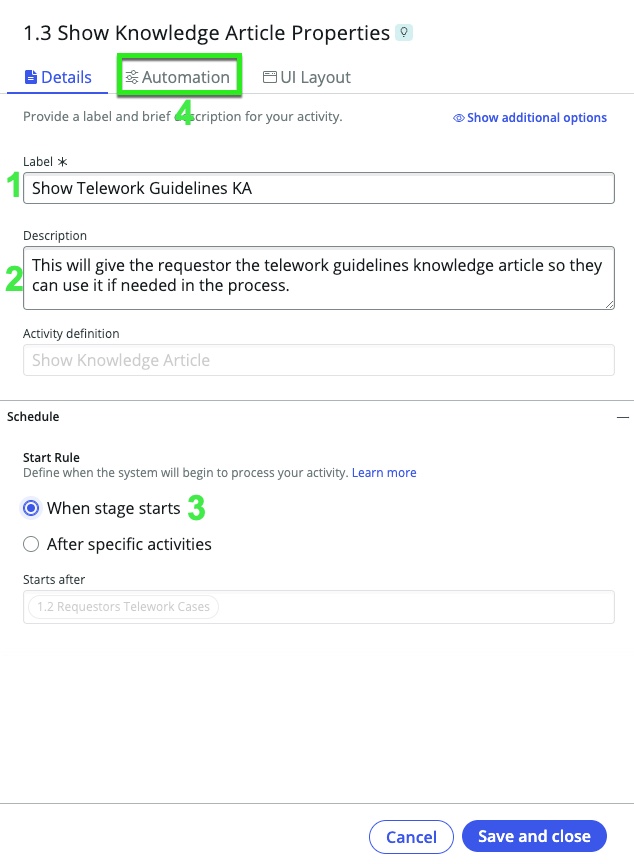
Fill out the 'Automation' tab
➊ Title Telework Guidelines ➋ Knowledge Article KB0050185 ➌ Click 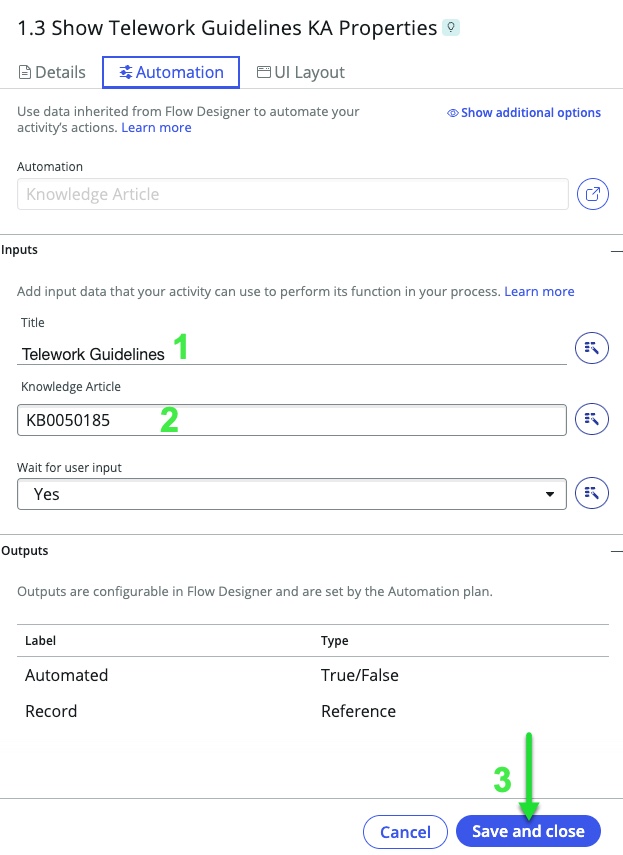
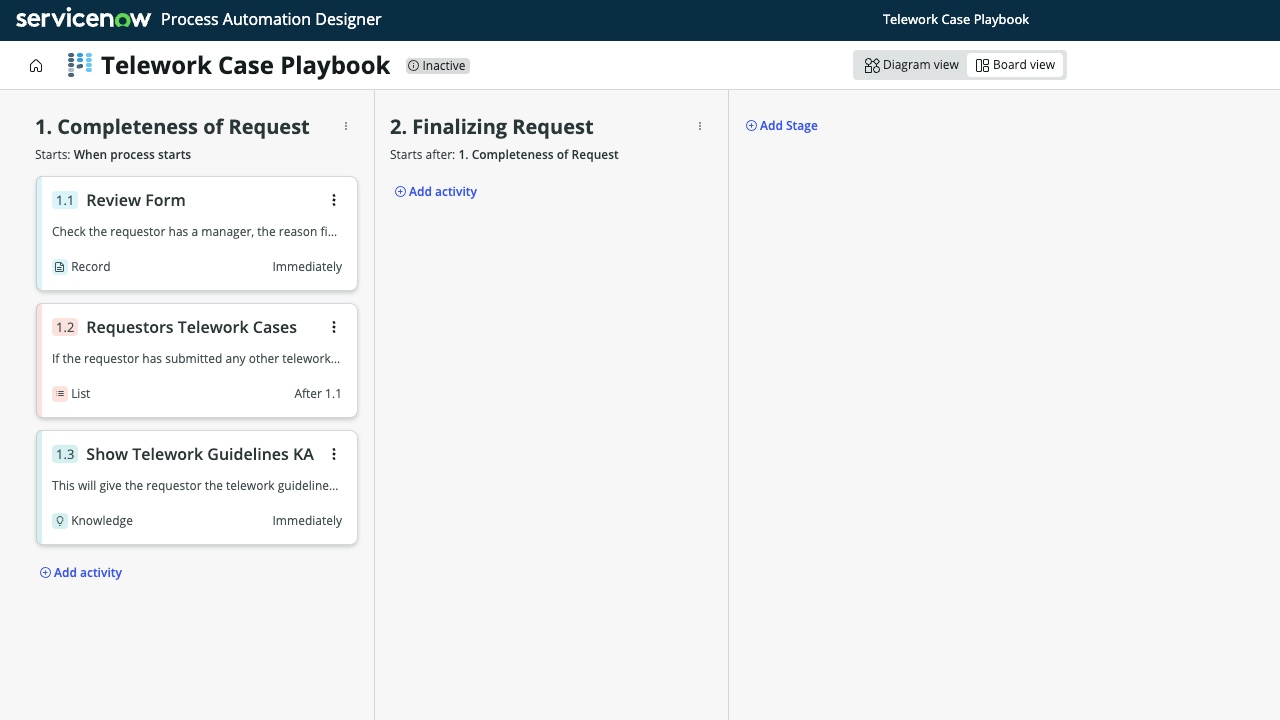
Super – your process should look like this now:
If you have an error regarding an 'end connection' for step 2
- Go to 'Diagram View'
- Connect Activity 1.2 to Stage 2
- It should look like this:
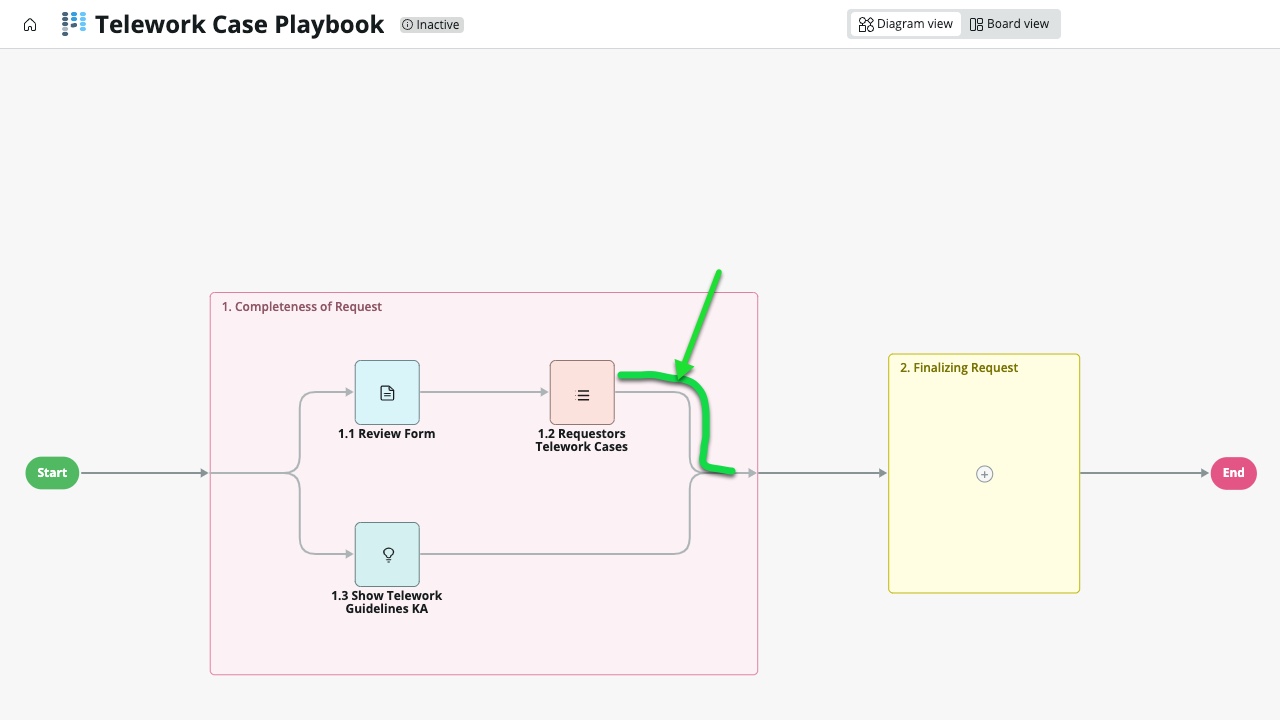
- then go back to Board view
Feel free to take a break and test out your process like we did earlier
For the second column, 'Finalizing Request' stage, we will be adding just one activity.
Under the 'Finalizing Request' column
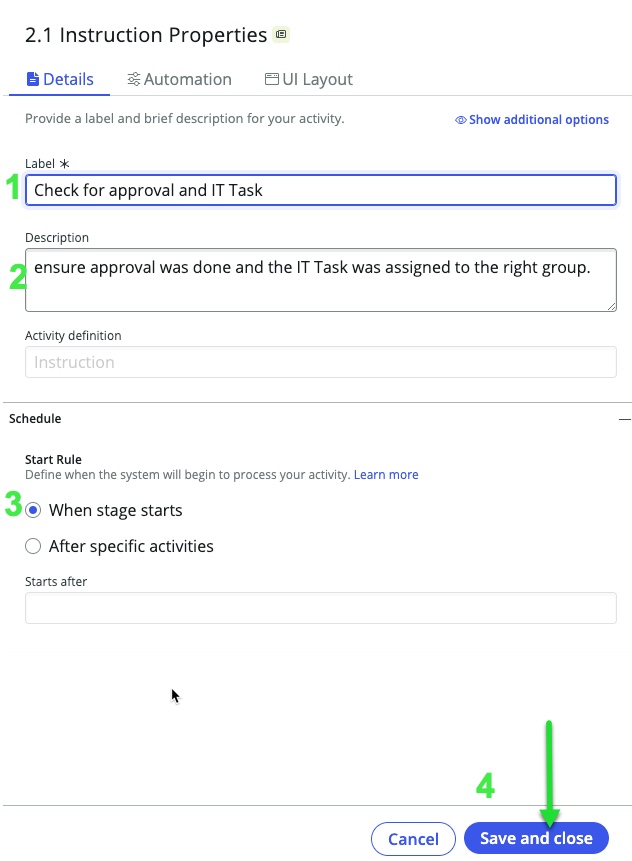
Click Choose ➊ Common Activities ➋ Instructions In the 'Edit activity properties' on the right hand side
➊ Label Check for approval and IT Task ➋ Description ensure approval was done and the IT Task was assigned to the right group ➌ Start rule When stage starts ➍ Click
That's it! If you look under the 'Automation' tab it automatically puts the description as your instruction. Your form should look like this:
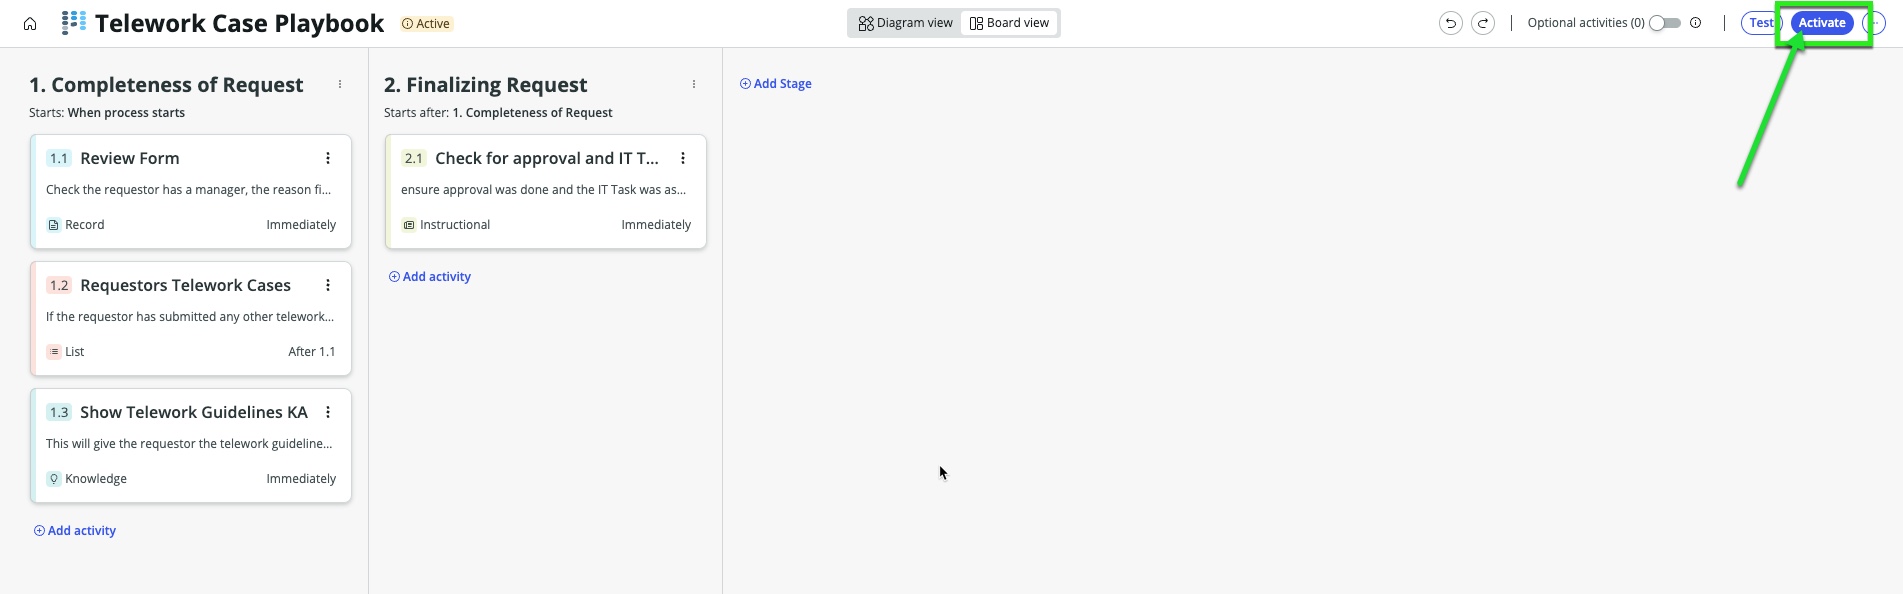
Now, you're all set with version one of your Playbook! It's time to click on
What else would you add to the process?
Did you notice an activity for manager approval? Some great activities are already in there, out of the box!
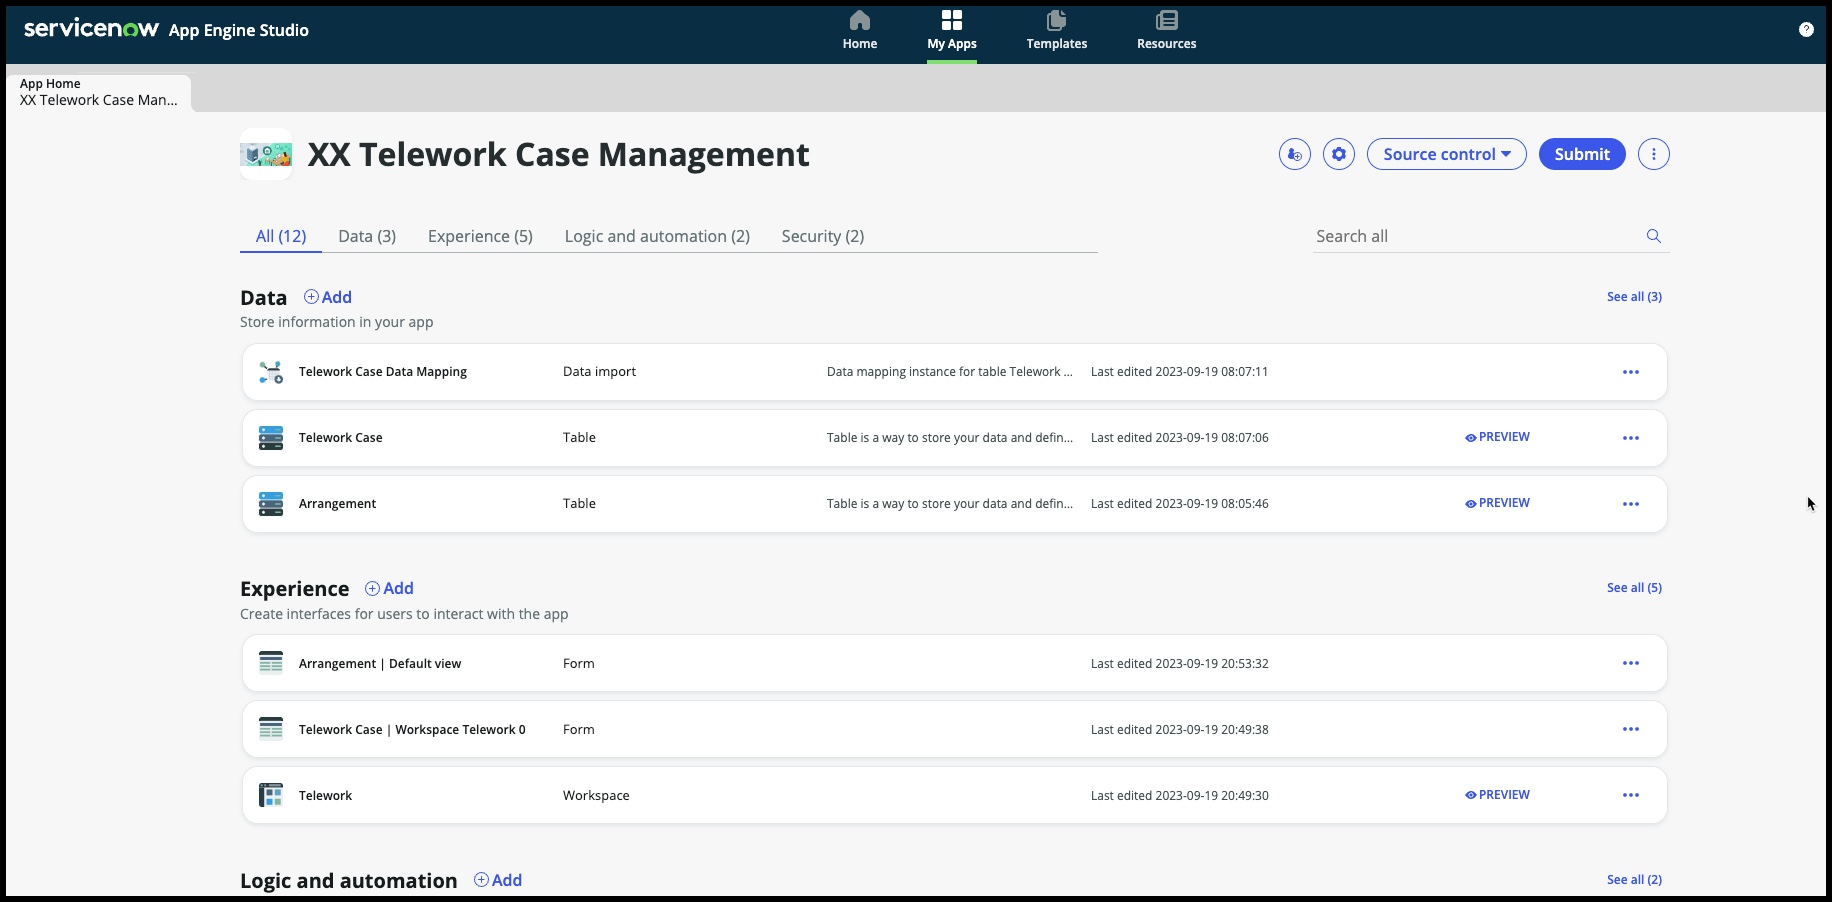
Now that we have published the playbook, we need to add the playbook to our workspace in app engine studio.
➊ Open 'App Engine Studio' ➋ Open your 'Telework Case Management' application You should now be here:
Edit the 'Telework' workspace
(if 'Get Started' pops up, go ahead and click on that)
You should now be in the workspace builder, your screen should look something like this (some of the reports may differ)
At the top of the page:
Click 'Record pages' Choose 'Telework Case Record Page' 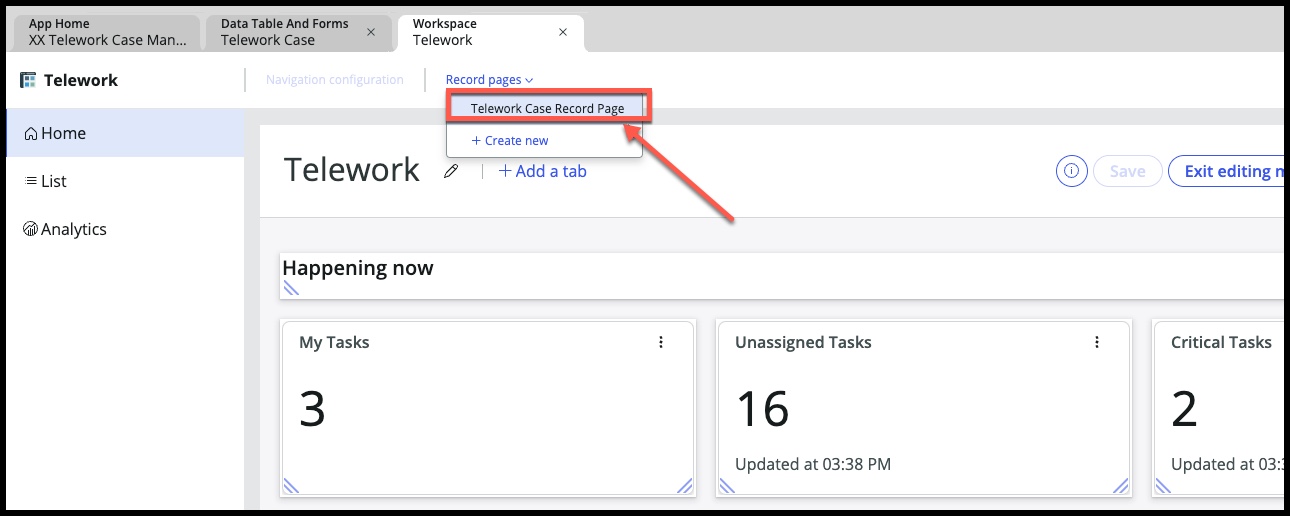
On the left hand side, choose 'Record details' on the left navigation bar
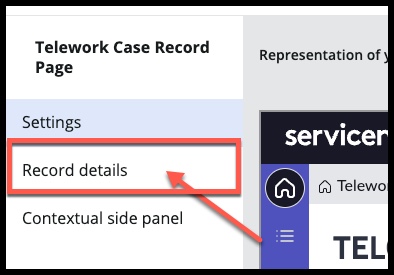
On the far right side, is the Record details configuration pane
Click on + Add playbook 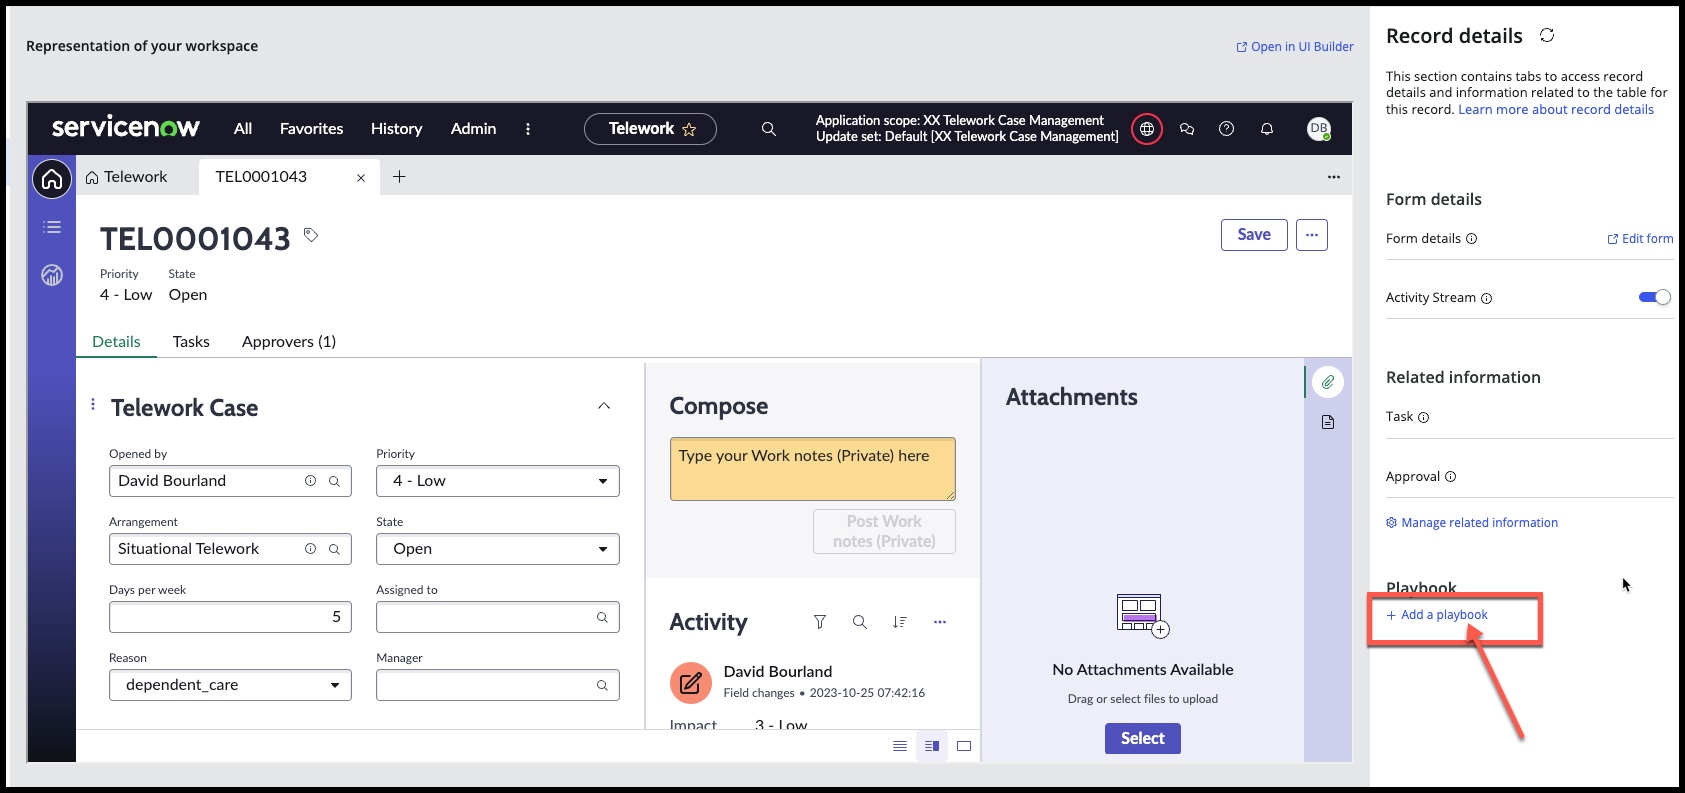
Enter in these fields:
➊ Tab name Telework Playbook ➋ Playbook experience Global Playbook Experience ➌ Click 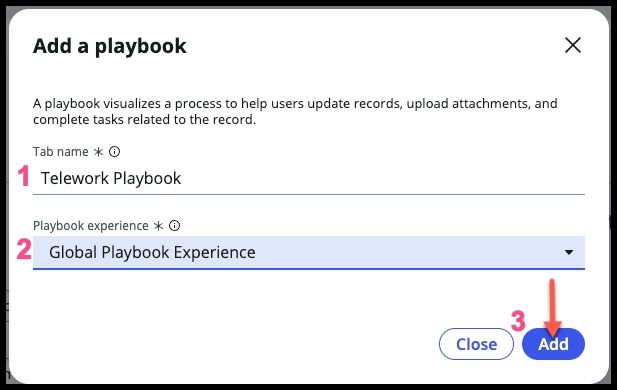
So, what is a playbook experience?
After creating your process in the process automation designer, you can either use the out of the box experience "Global Playbook Experience" which is great if you used all out of the box activities and like the way it looks in the workspace.
The other option is you can create your own experiences and components which can give you even more flexibility for the user to work. You can even use UI Builder to create new components and further create the exact experience your workers need.
For more on using playbook experiences, there are a lot of resources – here are a couple:
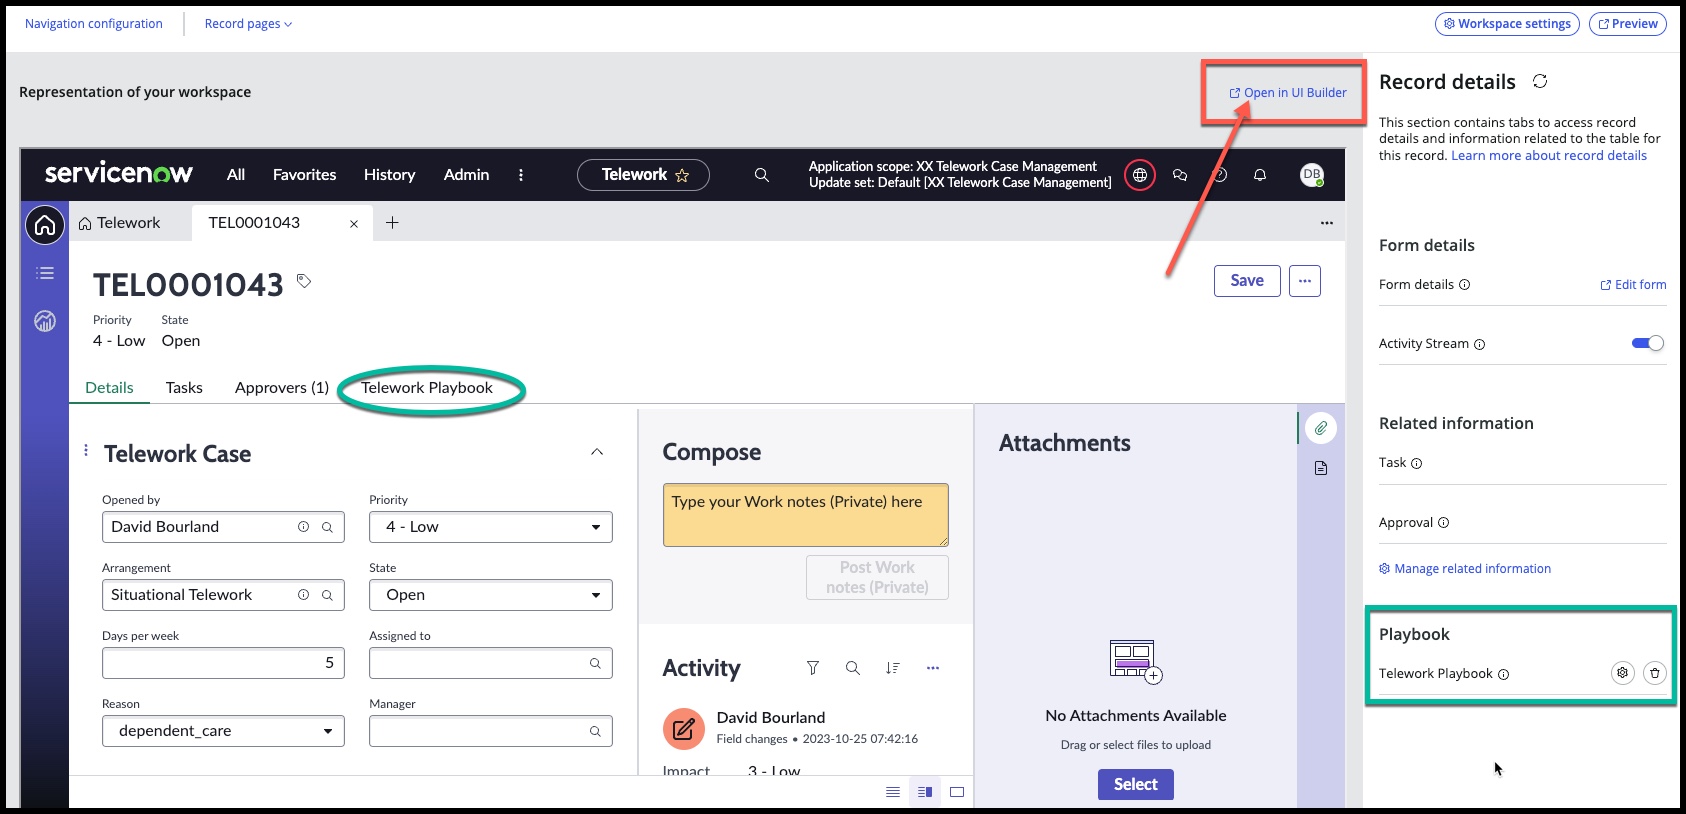
Now that you have added the playbook to the workspace, take note of how it's showing up as a tab on the record page at the very end, the last tab.
Let's move it to the very beginning. This is how it looks now – go ahead and click on the link in the upper right 'open in UI Builder' (and if there's a pop up, continue to UI Builder)
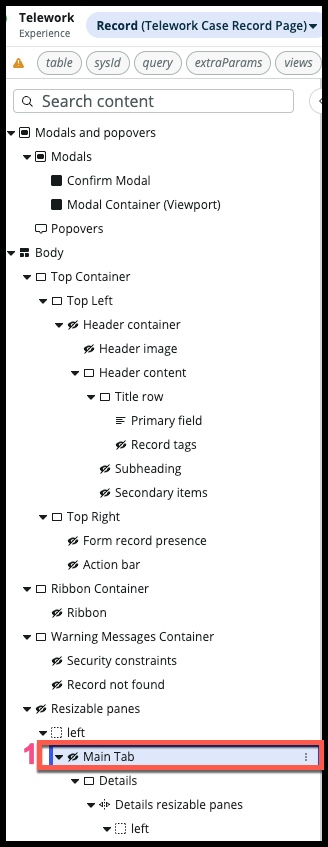
Now that you're in UI Builder – it takes a minute to load. Soon, you will see the pages and sections on the left.
- On the left go to: (these should already be expanded)
Body
- Resizable panes
- Left
- Click on "Main Tab"
On the right side pane of UI Builder
Drag the Telework Playbook tab so it's on top of the Details tab.
It should look like this and then Click :
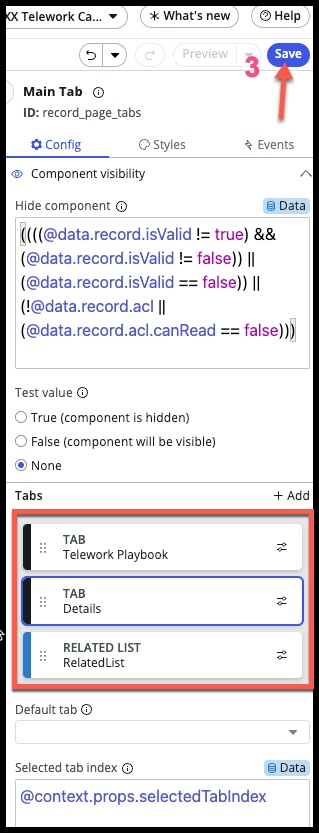
You're done! When the 'Save' button in the upper right is greyed out, you're good to close this tab and now we'll test in your workspace.
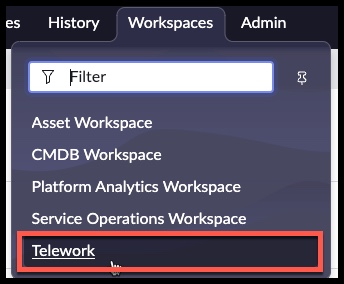
Go back to the platform view and under workspaces, find 'Telework':
The playbook runs when a new Telework case is created, so we'll need to do that in order to see our playbook in action.
When the workspace opens:
➊ Choose 'List' Menu on far left ➋ Choose 'New' 
Fill in the fields:
Arrangement Remote Justification Dependent Care Click (if it doesn't show up right away, refresh browser – this might happen the first time you run it)
Here's your playbook
- Walk through it and check out the experience –
- What would you do differently?
- What else would be helpful?
Congrats!